|
METAL SEALS
Ultra Seal offers a range of Metal O and Metal C seals for use in severe environments, for instance where high pressure and temperature have to be supported simultaneously.
When choosing a particular metal seal design, the following considerations should be made to ensure the best possible sealing integrity
- The load should be applied as close as possible to the sealing line of the seal
- Seating load is dependant upon cross section/material thickness/heat treatment/groove depth and material. A guide to typical loads are shown in the tables for O or C seals
- Surface finishes should be as noted for the sealed medium and the preparation of the surface finishes should be considered prior to manufacture
- Choice of a plating/coating will improve sealing as this helps fill any small surface irregularities in the hardware. Silver is the most widely used plating.
Metal O seals are manufactured from hollow tubes and can be pressure filled if required.
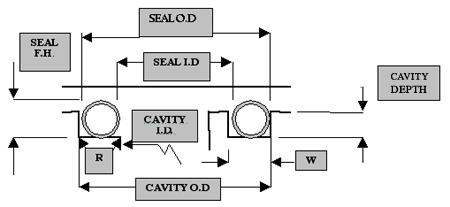
Metal O Seal – Internal Pressure.
All dimensions are in mm and prior to plating/coating.
For plated or coated seals, increase the cavity O.D. by 2x the plating/coating thickness.
|
SEAL
|
CAVITY
|
|
Free Height
|
I.D.
|
Cavity O.D.
|
I.D. Max.
|
Depth
|
W
|
R
|
|
Seal O.D Minus
|
Seal O.D Plus
|
Tol
|
Seal I.D. Minus
|
Min/Max
|
Min
|
Max
|
|
0,89
|
2,30
|
0,13
|
+0,13
|
2,29
|
0,64/0,70
|
1,40
|
0,25
|
|
1,58
|
3,43
|
0,13
|
+0,13
|
3,81
|
1,20/1,27
|
2,29
|
0,38
|
|
2,39
|
5,08
|
0,25
|
+0,13
|
5,59
|
1,95/2,00
|
3,18
|
0,51
|
|
3,18
|
6,86
|
0,25
|
+0,13
|
7,37
|
2,50/2,67
|
4,06
|
0,76
|
|
3,96
|
8,38
|
0,40
|
+0,13
|
9,53
|
3,20/3,30
|
5,08
|
1,27
|
|
4,78
|
10,16
|
0,40
|
+0,13
|
11,43
|
3,80/3,94
|
6,35
|
1,52
|
|
6,35
|
13,46
|
0,50
|
+0,20
|
15,24
|
5,10/5,20
|
8,89
|
1,52
|
Metal O Seal – External Pressure.
All dimensions are in mm and prior to plating/coating.
For plated or coated seals, decrease the cavity I.D. by 2x the plating/coating thickness
|
SEAL
|
CAVITY
|
|
Free Height
|
O.D.
|
Cavity I.D.
|
O.D. Min.
|
Depth
|
W
|
R
|
|
Seal I.D. Plus
|
Seal I.D. Minus
|
Tol
+0,000
|
Seal I.D. Plus
|
Min/Max
|
Min
|
Max
|
|
0,89
|
2,03
|
0,00
|
-0,13
|
2,29
|
0,64/0,70
|
1,40
|
0,25
|
|
1,58
|
3,43
|
0,00
|
-0,13
|
3,881
|
1,20/1,27
|
2,29
|
0,38
|
|
2,39
|
5,08
|
0,13
|
-0,13
|
5,59
|
1,95/2,00
|
3,18
|
0,51
|
|
3,18
|
6,86
|
0,13
|
-0,13
|
7,37
|
2,50/2,67
|
4,06
|
0,76
|
|
3,96
|
8,38
|
0,25
|
-0,13
|
9,53
|
3,20/3,30
|
5,08
|
1,27
|
|
4,78
|
10,16
|
0,25
|
-0,13
|
11,43
|
3,80/3,94
|
6,35
|
1,52
|
|
6,35
|
13,46
|
0,25
|
-0,20
|
15,24
|
5,10/5,20
|
8,89
|
1,52
|
Metal C Seals
Metal C seals are die formed from strip material and are probably the most widely used metal resilient seal. They offer lower seating loads and higher degrees of springback than metal O seals.
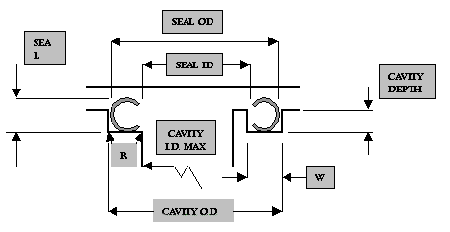
Metal C Seals - Internal Pressure
All dimensions are in mm and prior to plating/coating.
For plated or coated seals, increase the cavity O.D. by 2x the plating/coating thickness.
Both seal designs can be manufactured in non-circular shapes.
|
SEAL
|
CAVITY
|
|
Free Height
|
O.D
|
Cavity I.D.
|
O.D. Min.
|
Depth
|
W
|
L
|
|
Seal I.D. Plus
|
Seal ID Minus
|
Tol
|
Seal I.D. Plus
|
Min/Max
|
Min
|
Max
|
|
1,57
|
2,67
|
0,25
|
See Table
|
3,12
|
1,295/1,245
|
1,65
|
0,508
|
|
2,39
|
3,92
|
0,25
|
See Table
|
4,44
|
1,956/1,854
|
2,41
|
0,762
|
|
3,18
|
5,08
|
0,25
|
See Table
|
5,59
|
2,642/2,525
|
3,18
|
1,143
|
|
4,78
|
7,62
|
0,25
|
See Table
|
8,13
|
3,937/3,875
|
4,83
|
1,778
|
|
6,35
|
10,16
|
0,25
|
See Table
|
10,66
|
5,207/5,055
|
6,35
|
2,286
|

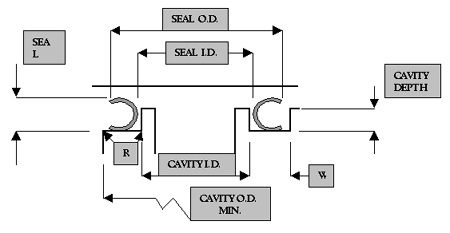
Metal C Seals – External Pressure
All dimensions are in mm and prior to plating/coating.
For plated or coated seals, decrease the cavity I.D. by 2x the plating/coating thickness
|
SEAL
|
CAVITY
|
|
Free Height
|
O.D
|
Cavity I.D.
|
O.D. Min.
|
Depth
|
W
|
L
|
|
Seal I.D. Plus
|
Seal ID Minus
|
Tol
|
Seal I.D. Plus
|
Min/Max
|
Min
|
Max
|
|
1,57
|
2,67
|
0,30
|
See Table
|
2,95
|
1,295/1,245
|
1,65
|
0,508
|
|
2,39
|
4,06
|
0,30
|
See Table
|
4,44
|
1,956/1,854
|
2,41
|
0,762
|
|
3,18
|
5,08
|
0,30
|
See Table
|
5,97
|
2,642/2,525
|
3,18
|
1,143
|
|
4,78
|
7,65
|
0,40
|
See Table
|
8,97
|
3,937/3,875
|
4,83
|
1,788
|
|
6,35
|
10,21
|
0,40
|
See Table
|
11,99
|
5,207/5,055
|
6,35
|
2,286
|
Cavity Tolerance Range for Metal C Seals Internal and External Pressure
For plated or coated seals, increase the tolerance by 2x the plating/coating thickness. Do not adjust the cavity depth
|
CAVITY OD
RANGE
|
INTERNAL PRESSURE
|
CAVITY ID
RANGE
|
EXTERNAL PRESSURE
|
|
UP TO 23
|
-0,00/+0,025
|
UP TO 23
|
+0,00/-0,025
|
|
24-52
|
-0,00/+0,051
|
24-52
|
+0,00/-0,051
|
|
53-95
|
-0,00/+0,076
|
53-76
|
-0,00/-0,076
|
|
96-139
|
-0,00/+0,102
|
77-127
|
-0,00/-0,102
|
|
140-190
|
-0,00/+0,152
|
128-178
|
-0,00/-0,152
|
|
191-266
|
-0,00/+0,203
|
179-254
|
-0,00/-0,203
|
|
267-393
|
-0,00/+0,305
|
255-381
|
-0,00/-0,305
|
|
394-517
|
-0,00/+0,381
|
382-505
|
-0,00/-0,381
|
Metal C Seal OD and ID Tolerances
For plated or coated seals, increase the tolerance by 2x the plating/coating thickness.
|
CAVITY OD
RANGE
|
INTERNAL PRESSURE
|
CAVITY ID
RANGE
|
EXTERNAL PRESSURE
|
|
UP TO 52
|
+0,00/+0,051
|
UP TO 52
|
+0,51/-0,00
|
|
53-95
|
+0,00/+0,076
|
53-76
|
+0,76/-0,00
|
|
96-139
|
+0,00/+0,102
|
77-127
|
-0,00/-0,00
|
|
140-190
|
+0,00/+0,152
|
128-178
|
-0,00/-0,00
|
|
191-266
|
+0,00/+0,203
|
179-254
|
-0,00/-0,00
|
|
267-393
|
+0,00/+0,305
|
255-381
|
-0,00/-0,00
|
|
394-517
|
+0,00/+0,381
|
382-505
|
-0,00/-0,00
|
|
